TB Staircase Tutorial (WIP!!!)
{ PAGE 1: Setup }
PAGE 2: Build →
PAGE 3: Finish →→
This is a tutorial that I've previously given one-on-one. The goal is to get you comfortable building brush-based geometry and equip you with some best practices.
The target audience is Godot users using a Quake .map interpreter plugin for 3D level building. I will NOT teach you how to set up said Godot plugins, or create a game-ready BSP for Quake (but these fundamentals will still help for Quake mapping).
Welcome to TrenchBroom! We're here to go over the fundamentals, so you can get to building your Godot levels (or whatever)
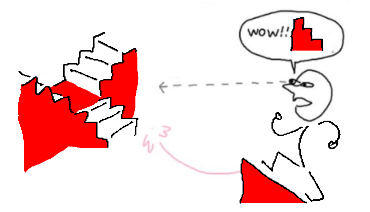
Our goal is to build a basic, foyer-style, forking staircase -- but we want the stairs' colliders to be an invisible ramp. This is always best practice, for gamefeel (less jittery, plays nicer with physics) and performance (fewer colliders)
This will teach you all you need for basic level-building. At the end, I'll link a couple of advanced tutorials for complex geometry.
The first thing you'll be greeted by is the 3D View. Use WASD to move laterally, Q/X to move vertically. Look around by holding Right Click and dragging.
(Enable night mode in View > Preferences > View > User Interface -- requires restart)
This program is made by crazy people, who only give you the 3D view by default. Before we get started, we'll enable the sane person layout:
View > Preferences > View > Map Views > Layout > Four Panes
While we're at it, let's disable the Info Panel for more screen space:
View > Toggle Info Panel
Now we have access to the 2D views, one for each axis! We'll put them to use on PAGE 2 →, but stick around here to learn what this goofy block is! (extra credit :3)
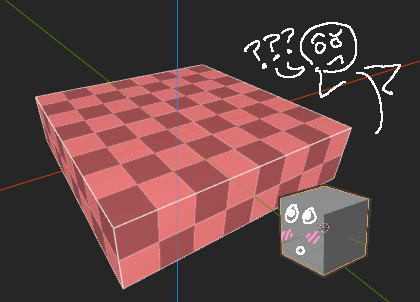
Is it... a bunch of voxels? a quirky Blender cube? a slab of granite?
Not quite. This is a BRUSH. (bad name, i know)
They're the basic building block of any BSP map editor. Each one is a CONVEX mesh (as opposed to CONCAVE), which makes them efficient for collision checks.
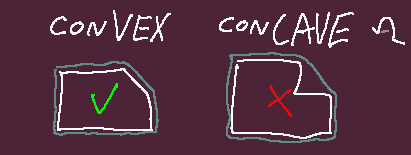
CONVEX? CONCAVE? What's the difference??
Imagine covering the shape in plastic wrap, pulled tight. If the wrap can rest on the shape's entire surface area, it's CONVEX. If there's an air pocket, it's CONCAVE.
Alternatively, if you cut a CAVE into a CONVEX shape, it becomes CON-CAVE.
This means that we can check for collisions by simply asking whether we're in between any 2 points within the shape, which is exponentially faster than ALSO checking whether we're inside an air pocket.
(At least, that's what the math nerds say - this stuff is over my pay grade, I dropped out of high school lmao. Here's a great in-depth read about it (from a much smarter person) if you're curious, with a section focusing on convexity: Toptal VG Phys Tutorial by Nilson Souto, part II)
In TrenchBroom, brushes are automatically kept CONVEX at all costs. Essentially, it will apply the plastic wrap test after modifying a brush, and -- if it fails -- use the plastic's surface as your brush's new geometry, deleting any vertices caught in an air pocket. If the program's fighting you on a weird brush shape, this is probably why. Just split it into multiple brushes, don't be afraid to add more.
Other editors will just give you an invalid brush error and say "figure it out dummy", so you should appreciate this feature, even when it ends up mangling a brush because you sneezed and dragged a vertex too far.
{ PAGE 1: Setup }
PAGE 2: Build →
PAGE 3: Finish →→